About my Blog

This blog is to showcase all the cookies I make and decorate and am hoping to sell via my page links on the side bar, but for now just browse the site and the 'cookie gallery' and enjoy because I certainly enjoyed making each and every one of them.
Showing posts with label custom cookies. Show all posts

Mar 26, 2011

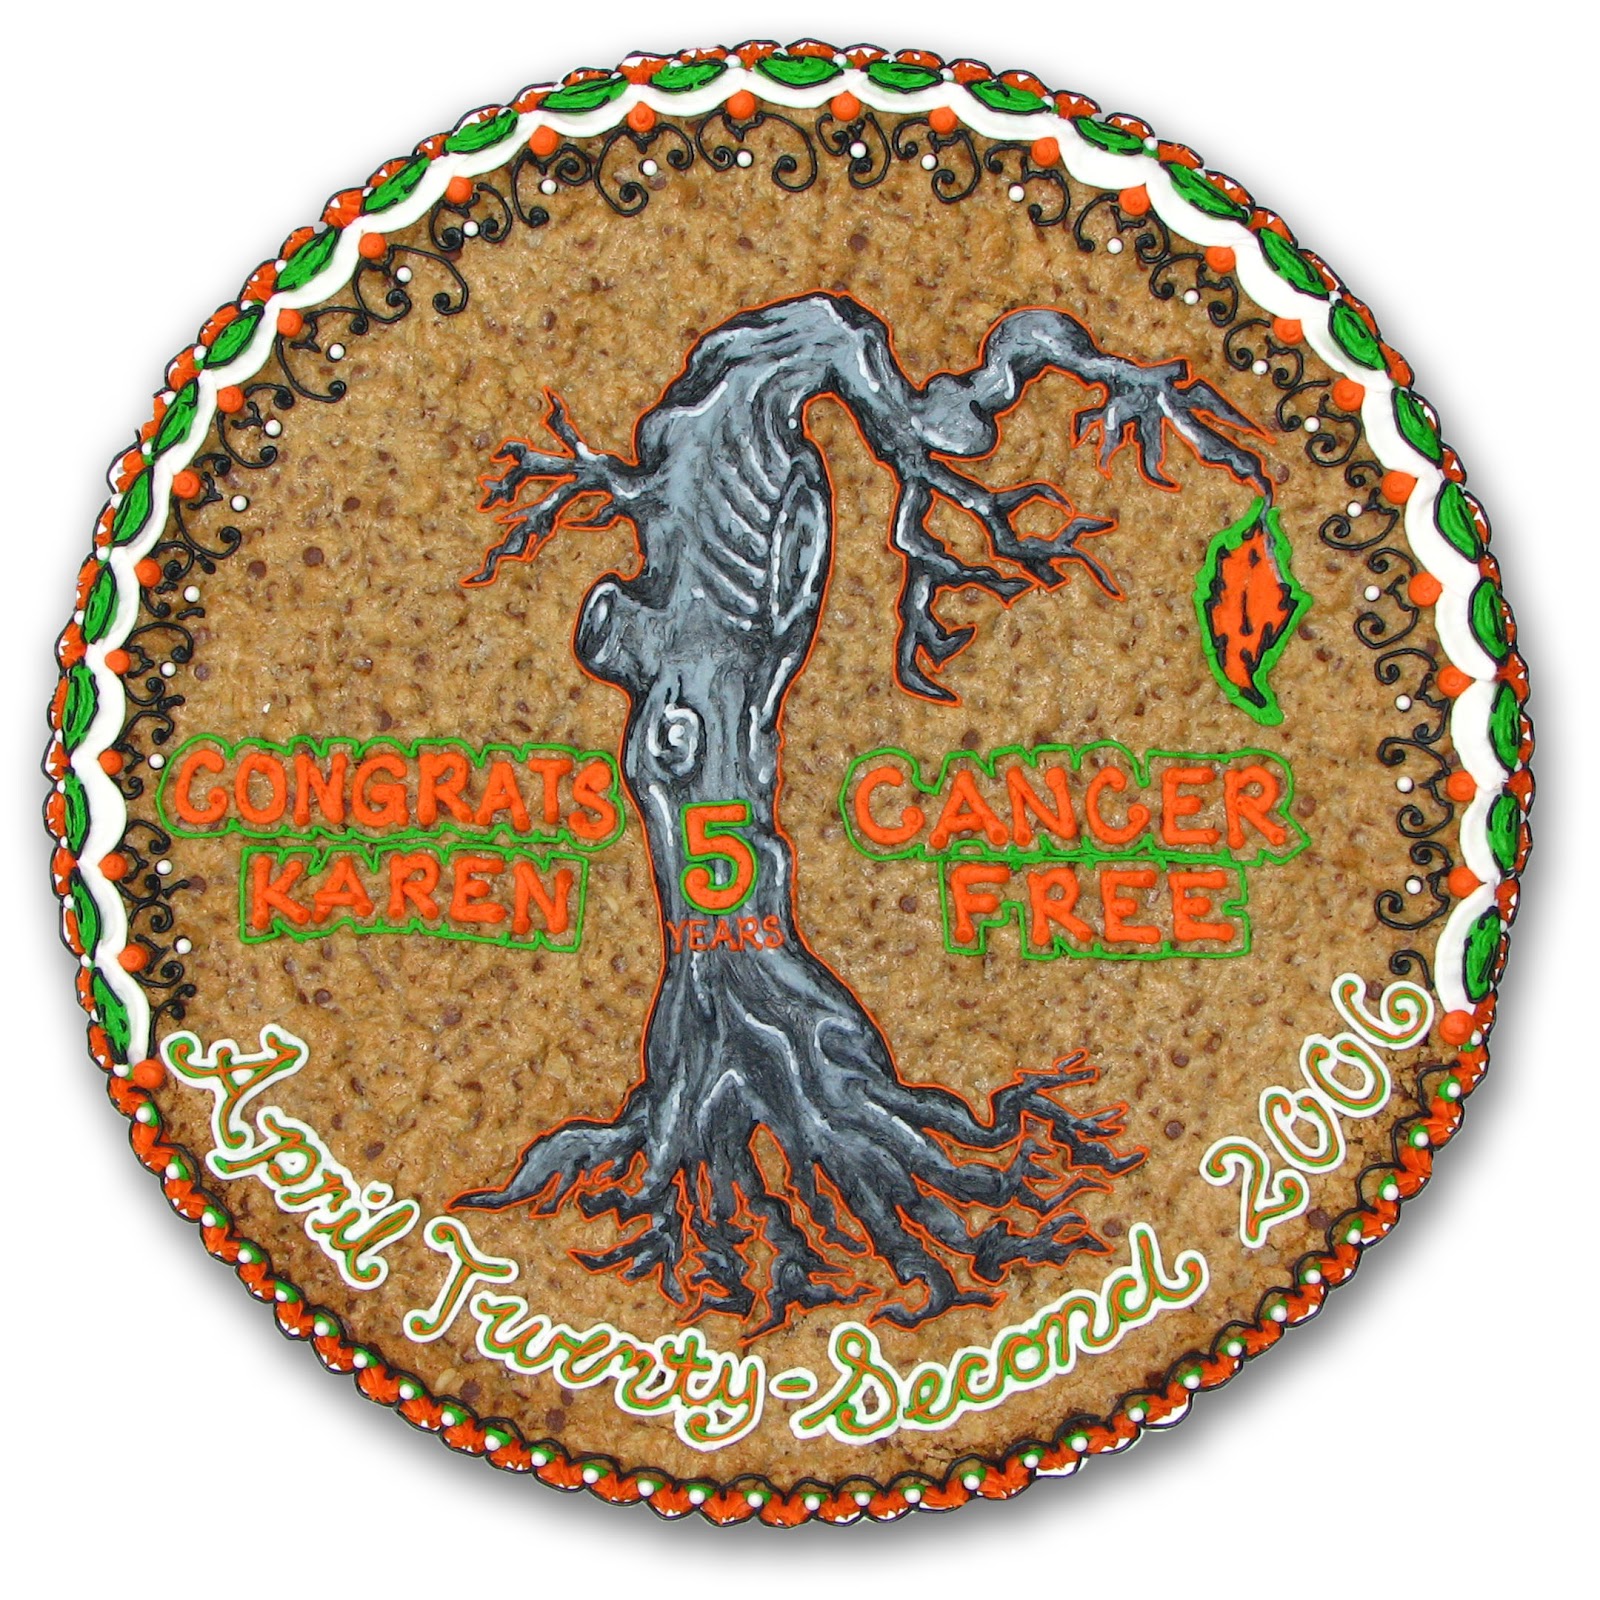
Cancer-Free Tattoo Cookie

click to enlarge

After a battle with bladder cancer that left her with a scar, my sister-in-law's younger sister decided to put a tattoo over that scar and for five years the scar and the tattoo are all that she has left from her battle, because she has successfully been cancer free for that entire time, which is truly amazing!

To celebrate that anniversary, my sister-in-law asked me to make her a cookie. This was truly a custom cookie. I knew that she had a tattoo so I suggested that we make the cookie and the anniversary very personal and very special by recreating the tattoo that means so much to her. 

The tattoo itself is a very intricate, detailed and highly personal reflection of a very hard time, so I used orange (her favorite color) and green along with a bright white to contrast and compliment the very artful tattoo that an artist had created just for her. The white border around the top of the cookie and highlighting the date of remission, along with the multiple details I included in it, contrast well with the center image making both elements stand out and work cohesively together. 

I do not have the skill of a tattoo artist, but I was rather proud of my work here recreating from a cell phone image what an artist spent hours designing and applying. The fact that it was to commemorate something so special and so meaningful not only to my sister-in-law's sister and  family but on a different level to me as well made this cookie very personal and something I was very proud to be able to surprise her with.

Congratulations Karen!


Mar 25, 2011

Valpo Baseball Cookie(s)

click to enlarge


I was soo excited when my Aunt, after looking at this blog,
contacted me to make a cookie for her upcoming party. She has made and decorated these cookies for years and she trusted me to make one for her big party and I was honored to do it!  Plus, sports themes and mascot recreations are something I love doing for cookies and I was really pumped to get started on this one and make a great impression.

My cousin is a pitcher for the Valpo University baseball team.
Today, my Aunt and Uncle hosted 70 baseball players and parents at their house after a game against Butler. Their house and decor for parties always impress guests so I knew this cookie needed to do the same. 

And yes I said cookie (singular), but I'll discuss that later :)

My Aunt was a great help in designing the cookie. She had an idea of everything that she wanted to see included on the cookie and she sent me all the logos and info I needed which saved me time, but still gave me the freedom to put together the cookie and do all the finishing in my own way. 

I chose to do the more intricate Valpo logo because I think it makes a much stronger impression and a better look for the cookie. The 'baseball' banner underneath the University name is my own addition as an attempt to incorporate baseball into that center image. The baseballs themselves balance the cookie and stand out well along the edges while giving it a little extra detail with some clear sprinkles. The ribbon border is one of my favorite looks and the yellow ribbon connecting the baseballs was perfect for this cookie! The finishing touch was a generous sprinkling of silver sprinkles all around the edge to contrast the black tray and add a special touch. With a little text to cheer on the crusaders and some graphic designs to help bring the baseballs and the logo together I think I achieved a pretty well executed cookie that I am really proud to have created. 

but....

click to enlarge


Unfortunately, I had made a mistake!!

That cookie that I just decorated was supposed to be made without nuts! (A point that apparently slipped my mind while baking). To remedy this situation I decided to bake and design another cookie, the way my aunt had ordered it this time. Even though it was made and decorated in a short amount of time, the second cookie needed to match the look and quality of the first. For this second cookie, I wanted to do something more directly related to the baseball team itself so I chose to put their jersey as a center piece. I outlined the jersey with some similar graphics as the first cookie, included another shout out to the crusaders, and finished it off with another ribbon border and a round of sprinkles just like the first. 


It was a good thing they were hosting 70 people because in the end they received both cookies for the party since I had made such a mistake. My Aunt was gracious enough to accept 2 cookies and happily they both worked extremely well together and looked great in the party roomed decked out in Valpo gear.


Mar 16, 2011

Real Estate Function Cookie


I donated one of my cookies to a fund raising auction at my nephews'
school a couple of months back. The winning bidder decided to use the cookie for a real estate event that she was putting on today. 

The theme of the event was setting goals and in terms of the design she said "surprise me" so I tried another ambitious scene design for this cookie.

click to enlarge


To showcase a lofty goal, I wanted to show a street with all the homes on the street boasting sold signs.  I chose to use a one point perspective leading off into the sunrise to give the idea that these sold homes continue down the street. That's quite a goal for any real estate agent I think!

This wasn't the deign for all the flashy sparkly details, so instead I chose to focus on the homes and make them as realistic as possible. I used a specific tip with the icing to create horizontal lines of the siding which was very important to the look of the cookie. I did use sparkles in the cookie, but mostly to add texture to the roof. I think the technique and the roofs looked great in the end. A little more texture added in the landscaping and the whole scene comes together as it fades back to the focal point and highlights the whole street.

The cookie was meant to be inspirational and set the mood for the event that was being hosted. The theme of the event was well represented in the cookie and hopefully eating the cookie was the perfect end to the meal and to the event.


Mar 6, 2011

Omelets and Experiments

New idea.
Sugar Cookies!!

Although the chocolate chip cookie recipe I have is fantastic I thought it would be good if I added a sugar cookie recipe into the mix as well for a couple of reasons. First, it's always good to give people options when it's truly supposed to be something custom and second, the light color of a sugar cookie would give me a completely different canvas to work on. I wouldn't need to outline things in white icing any more to make sure they stand out against the cookie. 

10:30 pm Saturday
 Time for some experimentation...

I started my first and easiest experiment so late tonight due to an (on the house) extra shot in my cappuccino, which I had too late anyway, but I digress.  For this first attempt, I just used a couple of store bought sugar cookie dough rolls because I haven't looked around for a good recipe yet. It would be an understatement to say that I wasn't very optimistic when I started. I was so sure that the cooking time would be difficult to manage and what would come out would be burned and dark around the edge while being undercooked in the center, but...

I couldn't have been more happy to be wrong!!

All it took was a watchful eye and the cookie pretty much told me when it was done. Except for a raised lip around the edge from where to cookie raised up while cooking and then fell in the pan, what came out looked to be the perfect sugar cookie to decorate...but only time would tell. I simply cut the lip off with a knife and created a flat edge and that was that.

After it cooled and set I could tell it was the right density for decorating and then to make things better it pulled out of the pan with no problems. I removed the foil around the edge flipped it back over and voila!!! A perfectly even baked sugar cookie ready for decorating!!! Now all I need is my own recipe that reacts the same way and I'm in business...hopefully its as simple as I'm making it seem :) 

11:30 pm Saurday
Sugar Cookie Experiment #1...Success!

Fast forward (through a 1am trip to the ER with my brother) to the next morning.

 9:30 am Sunday 
Breakfast time

I had invited another of my brothers and sister-in-law over to the house for some homemade omelets and it was time to showcase and more importantly test my new cookie. (In addition to attempting to create the perfect cookie I am also working on the perfect omelet recipe as well and I'm getting pretty good at it in my humble opinion)

'popeye' omelet: 
spinach, broccoli, red pepper, pepper jack
 

Back to the Cookie...
I used the leftover icing from the Mardi Gras Cookie (see below) that I had made the day before and in between cooking the sausage and the other omelet ingredients and making made-to-order omelets for the fam I threw some 'decorations' on the cookie to hopefully brighten everyone's morning. 

The 'decoration' served another purpose as well. I needed to test the flavor of the decorator's icing with the sugar cookie and also see if the fact that I had to cut around the edge would distract from the integrity of the cookie and the design. That part is still up for debate, but thanks to my brother's suggestions I have some options to remedy that. There is however a very noticeable difference between the surface textures of the two different types of cookies. Although packed with chocolate chips and nuts the original cookie has a fairly even surface with a lot of little unobtrusive bumps whereas this first sugar cookie has larger crevasse that are more difficult to control the icing around. It's not a deal breaker, and I'm still waiting to see what my next experiment turns up, but for now I'm pretty happy it turned out this well and I'm excited for what I can do with the sugar cookie in terms of design now.

10:30 am Sunday
Time to dig in...

Why make a cookie if not to enjoy with family and friends? and did we ever enjoy it! It even made it around to a couple other family members that day so everyone could have a taste.


The cookie itself was evenly cooked from one end to the other with no discoloration around the edge. It has a very nice dense and chewy consistency that I adore in a good sugar cookie. The icing was perfect with the vanilla in the sugar cookie and the colors stand out so well against the light cookie color. Overall I am sooo excited to find the perfect recipe and start decorating these sugar cookies. I think people are going to love them and love the options that I can offer for a custom cookie.

Mar 5, 2011

Mardi Gras Themed Fundraiser Cookie

click to enlarge


My youngest brother is embarking on a mission trip to Honduras 
this summer with some friends from High School. They are attempting to raise funds to pay for the trip and one of the ways to do that was to host a themed fund-raiser and present their plan for the summer to prospective donors. Seeing as Mardi Gras is right around the corner it was a perfect party theme and the house was expertly decked out to fit that bill. 

 I chose to stick with the Mardi Gras colors and accentuate them with a lot of fun detailing and accessorizing. 

Although the mask's shape is simple the icing is full of texture 
in the green and purple regions as well as being topped off with plenty of sparkling sugar flakes to create a great glittering effect for Mardi Gras. The eccentric mask is displayed against a stark white background so that it stands out as much as possible. However, unlike most white backgrounds I create this one's edge adds to the exciting feel of the cookie and is another element 
that makes the design whole.

To buffer the edge of the mask against the bright white background I utilized the green, purple, and gold shimmering edible powder that I can paint with.
I made the strokes dynamic and festive and topped it off with gold glitter stars that radiate out from the mask.

I utilized the white iridescent sugar pearls a lot in this cookie to add depth and detail to the mask and to the overall design. It not only added texture, but added to the beaded effect that is so important to the Mardi Gras celebration. The idea of Mardi Gras beads also plays into the border that I chose to create. The mask is attached to a string of beads that form the border all the way around the top of the cookie. The bottom of the border is just a festive collection of star tipped shapes in the custom green, purple, and gold colors that works well below the string of beads surrounding the cookie.


To finish of the edge I sprinkled the border with purple, green, 
gold, and black sugar sprinkles which was a nice finishing touch that I will utilize more often. This cookie makes a bold statement with the large white area and it's erratic edge, the use of multiple layers of detail, and the lack of any text, but it works especially well against the dark cookie and is brought together by the boarder. It fit in perfectly at the party and looked great with the elegant decor for the night. 

Dec 22, 2010

Annie's 13th Birthday Cookie

It's been 3 years since I made my first cookie...

click to enlarge

Today is my cousin Annie's 13th Birthday marking that occasion.
It was for her 10th birthday that I made the Dolphin Cookie 

This cookie was made the day of the party so it wasn't as uniquely designed as that first one, but I still fit her current interests and passions which are strongly geared towards music into the birthday template that I have used in previous cookies like the Girl's Birthday Cookie. 

Annie not only loves being in the band, but she is also into crafts and design just like I was at her age, so I knew she would appreciate all the little details I put into the numbers making that the focus. I really like the choice of colors used in this cookie. The contrast between the different greens in the numbers really emphasizes the detailing on top of the bright green background and makes the detailing and music notes stand out more than the similar design of the pink numbers in the girl's birthday cookie. The background of the numbers is also coated in clear sugar sprinkles making it shimmer and all the details on top pop that much more. 

The music notes are emphasized by blue sugar peals that give a nice texture over the whole cookie. With the title on the top and such an emphasis on the numbers and the horizontal bars with the notes running behind them there was an empty space on the bottom of the cookie that needed some detailing; A simple music note and some white icing and the cookie was brought together nicely without much effort.

To draw attention to that little detail I made the border around it by alternating the two contrasting greens only in that area. The rest of the border that goes around the entire edge is made from alternating blue and white icing to emphasize the focus colors of the greens in the center of the cookie. I really liked this effect of the border and think it worked to bring the cookie to a cohesive design.

Wow! 3 years...here's to many more and many more fun and inventive designs

Dec 17, 2010

Cathedral Christmas Party Cookie

click to enlarge


My latest cookie was actually done in a bit of a rush, but I still did my best to make a fun and fitting cookie for the Cathedral girl's basketball program's annual Christmas party. I coached the freshman team so this again was a gift for the girls on my team as well as a way for me to chip in for the desserts in the pot-luck style party.

A couple of things needed to be included in the design: Basketball, Irish, and Christmas. I stuck to holiday colors because of the Christmas theme of the party and since the green works for both the school colors and the holidays it worked well for the cookie as a whole. 

I chose to do a similar design to my last basketball cookie.  At the center is a large basketball full of orange sprinkles, but for the holidays, I added a fun little twist and put the Santa hat on top of the ball. The hat actually added a lot of texture to the actual cookie, but sadly that part does not photograph particularly well. On the white fuzzy part of the hat, I used the same technique that I did to make the dog's fur a couple cookies back which adds depth and a more realistic look to the hat. I topped the white areas with clear sugar flakes that added just a bit more sparkle.

Overall, this is not my best nor my favorite cookie I've done and I could find many flaws that I would do differently given the chance, but for a last minute design I really did like some of the attributes of the cookie which I addresses above. It also worked very well for the casual event and the girls loved that I took the time to make something special for them. Most Important though is that the cookie tasted excellent and I left with an empty tray; always a good feeling.


Dec 3, 2010

St. Thomas Basketball Party Cookie

click to enlarge
St. Thomas Aquinas (STA for short) is a small catholic grade school in Indianapolis where I coached the 5th grade girls C team for the 2010 basketball season. So, for the end of the year party I decided to chip in for the desserts and make a cookie for the girls.

The design is straight forward mostly because they don't have a visual mascot that I could use so I decided to use the school's name atop a basketball. I chose to make the name large and bold to stand out against the basketball (which is covered in orange sprinkles, since we are dealing with 12 year old girls after all :D ) The year and mascot name surround the ball and the bold central element is completed with yellow dots and white sugar pearls to make a fun statement in the center of the cookie.

A fun element to this cookie is that I was able to include all the girls names from the two 5th grade teams that year. I decided that a Tiger paw would be a cute little addition to accompany the names and add an element to tie it back in with the name in the center. It took me awhile to finally come up with the idea, but I think it turned out so well and made the addition of the names much smoother since I could form them along with the little icon. The color of the paw also correlates to the 5th grade team the girl was on that year either the blue or gold team. I also added a single sugar pearl in the center of the paw, again it's something not necessary to the design, but a detail that was fun and appreciated by my girls who each wanted the piece with their names and the paw. 

The simple but fittingly festive border is perfect for this cookie and brings together all the school colors in a new way that really finishes off the cookie well. Seeing all the girls so excited about having their names on this cookie really made it so worthwhile and the compliments from the parents (especially all the dad's) made me really glad that I decided to make this cookie to celebrate the girl's season.

(sorry for the poor quality of the photo)


Nov 20, 2010

Mo's 30th Birthday Cookie

click to enlarge


This cookie was done for my sister-in-law's surprise 30th birthday party. I think the biggest surprise to me on that day was how well this cookie turned out. I've never done an image of someone's dog before and I think it turned out extremely well in terms of looking like the actual dog. His name is Rugger, a Bernese Mountain Dog...the shaggy hair is much more forgiving which probably helps, and it doesn't hurt that I know the dog and was therefore able to capture his personality. I think this cookie was the second biggest surprise that night for everyone there especially the birthday girl. The cookie was a huge success, but I'll let you be the judge of how well I captured the dog.


Birthday Girl!!

Sep 10, 2010

Gerbera Daisy Bridal Shower Cookie

click to enlarge


My newest sister-in-law chose beautiful coral gerbera daisies for her wedding flowers and I thought they would be the perfect design for the surprise cookie I made for her bridal shower.

I wanted to focus on the flowers yet still make it elegant and whimsical (another part of her design theme) so I chose to do multiple half flowers all around the edge to surround the solid white center and make it pop even more. The middle is just a smooth layer of white icing to display the names, date, and small daisy with a textured detail around the edge including iridescent sugar pearls.

I enjoy the way the green and white vines create a whimsical feel between the different rigid edges of the circle and the flowers. When I started, I was not confident in my decision to do the green vines, but in the end I think it turned out very nicely and I was especially happy with the way that part and brought all the element together.

The daisies themselves were made petal by petal to create a more textured and realistic feel and then brushed with a pink iridescent powder to create the depth I was hoping to achieve. the centers are made with a simple star tip that helped create even more realism and texture. A simple border between the centers of the flowers helps bring the whole cookie together and separates it from the decorative base. 

Congratulation Kevin and Kori!


Updated
5/17/2011
 
I was asked to do another cookie in this design this time as a farewell cookie for Susan working at Harrison College from her co-workers. And here is the final product. 


Sep 4, 2010

Favorite Things Birthday Cookie

click to enlarge

Most of the cookies I make are well planned ahead of time and drawn out with the knowledge of an upcoming event. This cookie was the opposite of that, but still turned out to be one of my favorite cookies. 

It always helps to know something about the cookie recipient and in this case I simply chose some of my uncle's favorite things and put them together for a great cookie! (Even though my mom and I decided to make the cookie at 10:00pm the night before driving down to their lake house for his impromptu party!!) Luckily, we had everything we needed and we knew what he liked so it was only a matter of putting it all down on a cookie. 

The Red Stripe drinking, Mickey Mantle loving, wishes he could be fishing daily, Yankees fan absolutely loved the cookie, especially since we surprised him by even coming up to the lake to celebrate his 60th birthday. It was a pretty great day, but then again every day spent at the lake is always a little bit better than the average day.


Aug 14, 2010

Gymbo Birthday Cookie

click to enlarge


Gymboree is one of my nephews' favorite places to go and play so when I was asked to do a cookie for a party there I was pretty excited to be able to include all the things that make that place so intriguing for the kids. 

The most recognizable thing about Gymboree is Gymbo the clown who I decided to put front and center on the cookie. I tried to add different textures where I could and use Gymboree's bright primary colors as a theme. I included bouncy balls, the big tent that they use in the classes, and tried make it look as though Gymbo was juggling the balls as well as Owen's name. I used sprinkles to make the 2's inside the bouncy balls and sprinkled them all around the outside border as well which all the kids loved. 

The border around the top was a new technique for me but seemed to fit in nicely with the clown theme and added a new texture and depth around the edge. 

This cookie was a lot of fun to make and even more fun to see eaten and enjoyed at the party by all kids and parents alike.


Jul 31, 2010

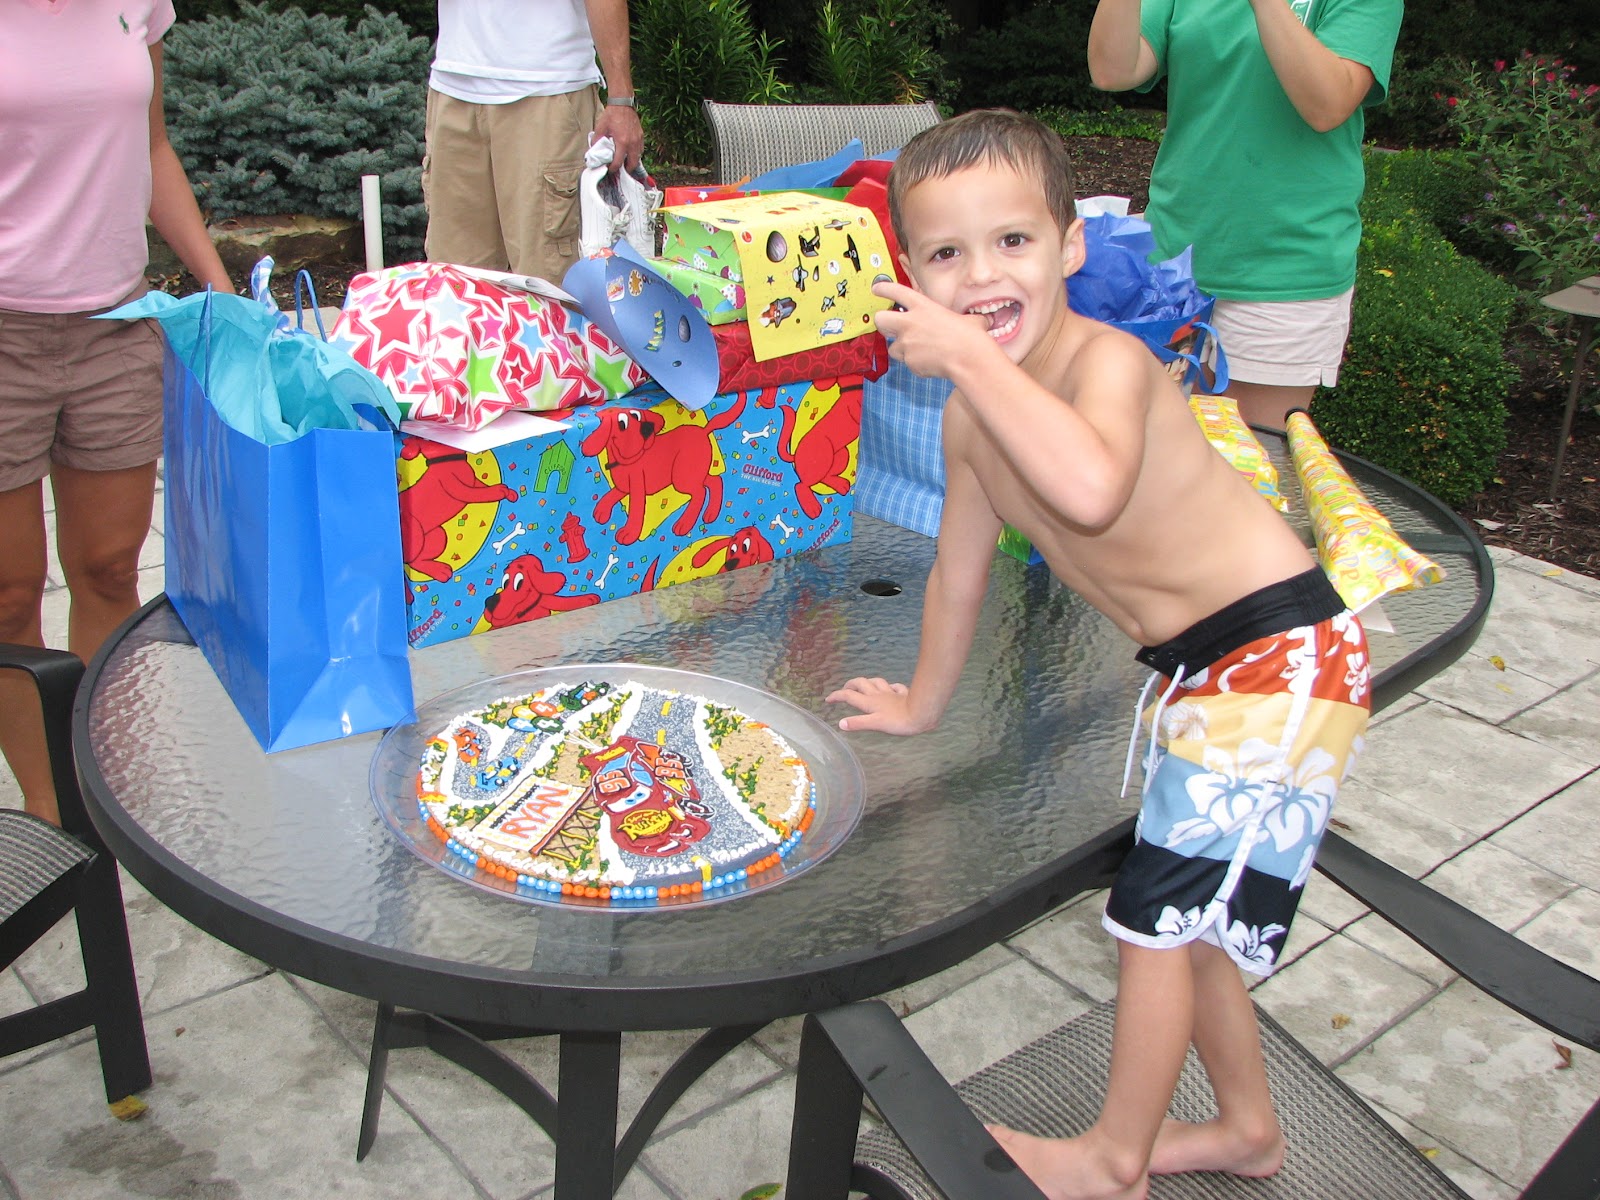
Cars Birthday Cookie

click to enlarge
 
Ever since Christmas my nephew has been updating me regularly with what he wants on his cookie for his 4th birthday. Luckily, some ideas like having Santa riding in the Lightning car fell by the wayside, but even since December he has wanted a 'Cars' cookie with Lightning McQueen on it and with balloons. 

So I decided to do a track scene with Lighting racing against some other recognizable cars characters. Of course I couldn't forget the balloons which I made look like they were tied to the back of Lightning and each has the number 4 on it. I gave the track some texture by adding silver sprinkles to the gray road which adds a great touch and made the cookie sparkle in the sun. To keep with the race track theme I put the 'happy birthday' and the birthday boy's name on a giant road sign with yellow dots and white sugar peals that make it look like the sign has lights around it. I even finished of the cookie by surrounding the edge with some of Lightning's best quotes. 

The best part of the cookie though, as my nephew will attest to, is the Lightning car (we had to cut out the car just for him to eat). The detail and character that the car has makes it look just like one from the movie making it instantly recognizable with its decals, numbers, and design. 

I was very proud of this cookie and the especially the work I did on the car, but I was most excited that I could make my nephew so happy on his birthday


(had to sneak a taste before everyone else)

Jul 15, 2010

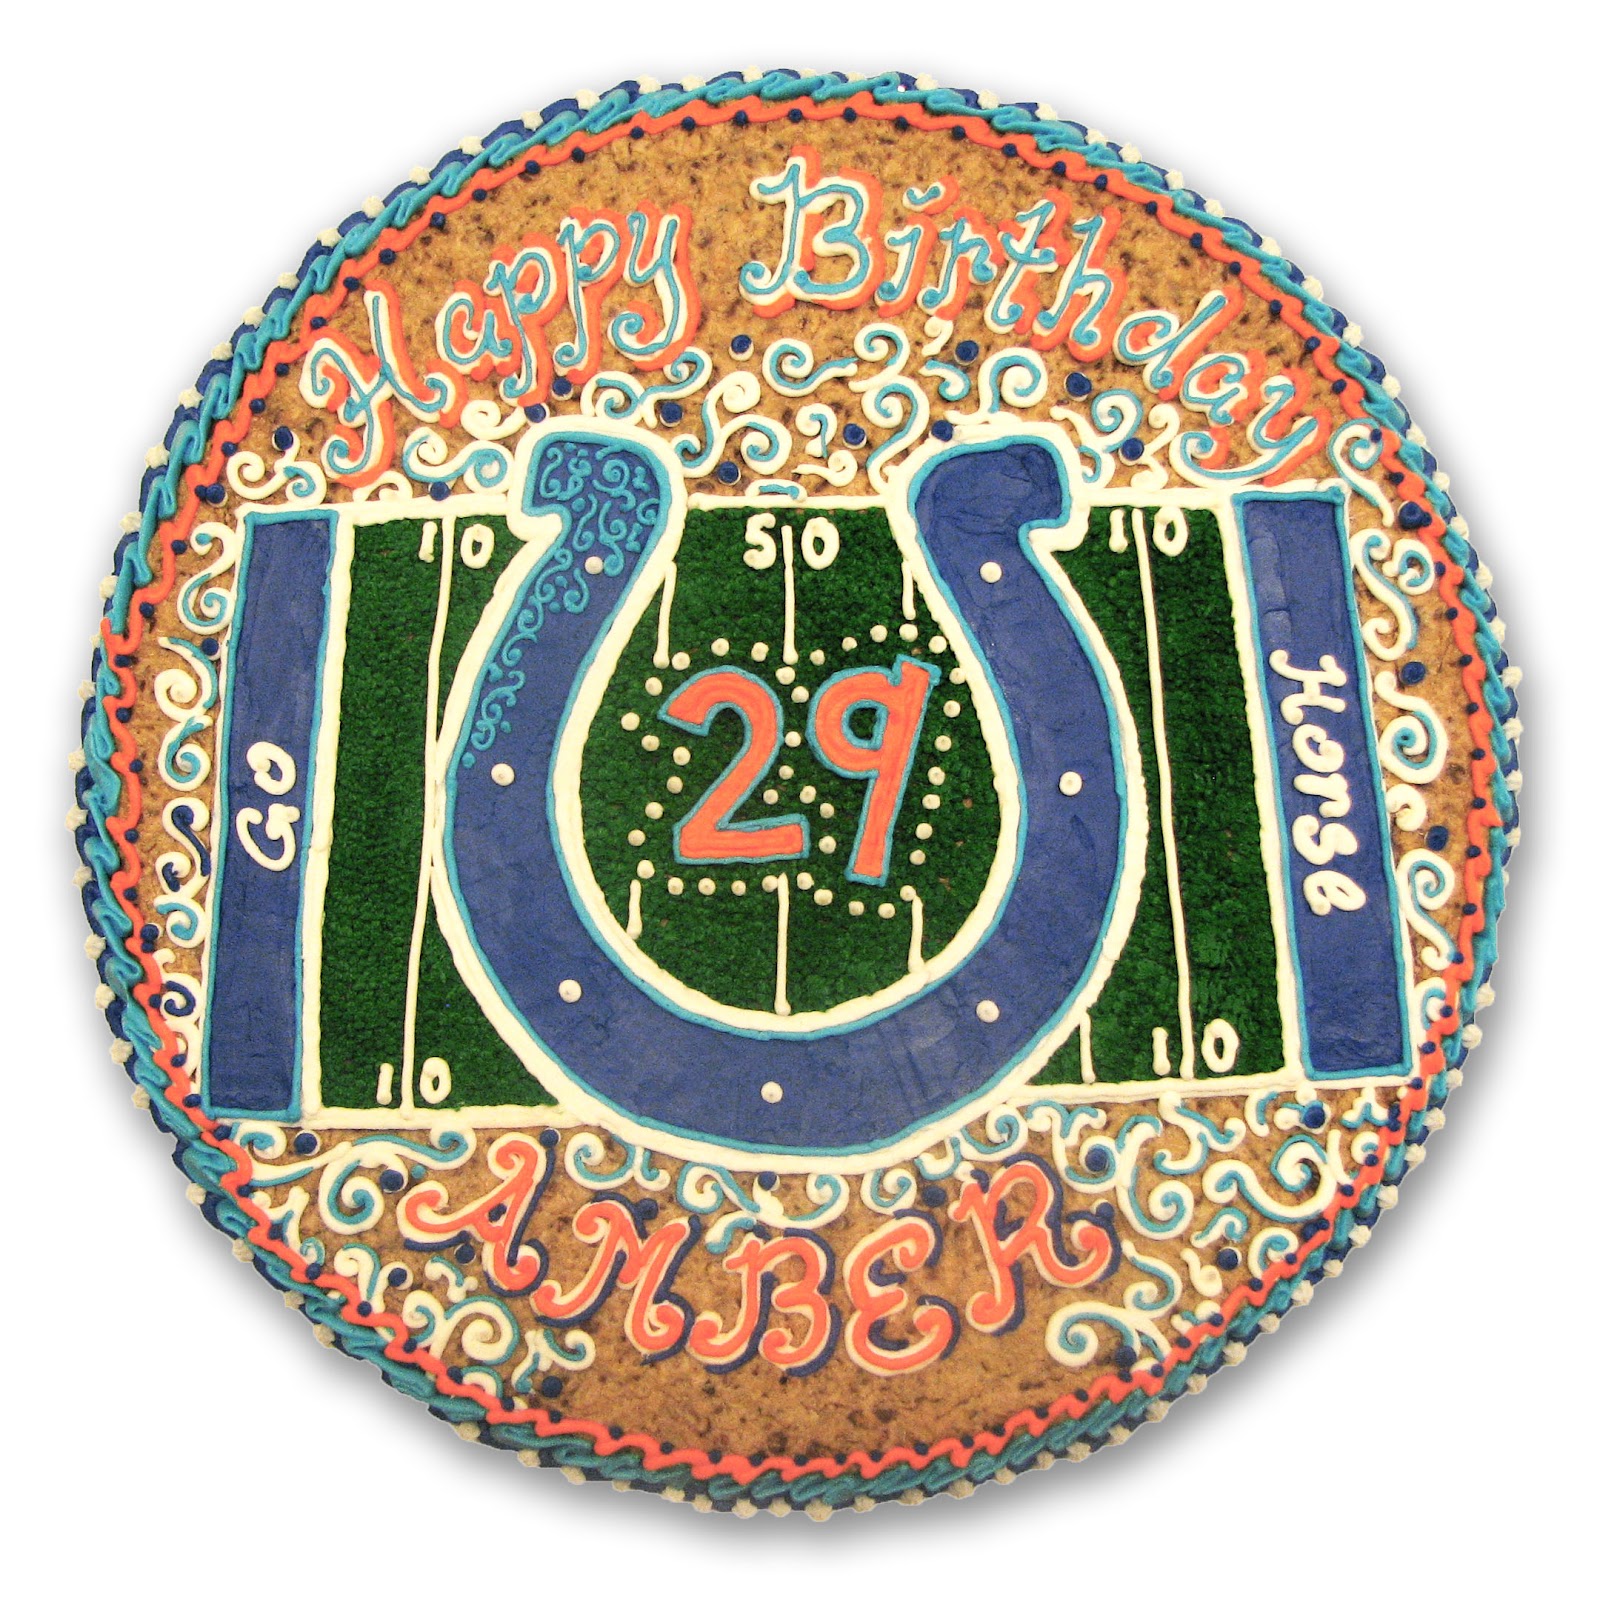
Colts Birthday Cookie

click to enlarge

 I would like to thank my former co-worker Jeff for presenting this opportunity to me....this is the first cookie I made for a client. Jeff had seen the Harley cookie that I made for another co-worker's birthday and I was so happy when Jeff asked me to do this for his sister's birthday. 

All Jeff told me was that she loves the Colts...Well, I love the Colt's too so I just went with it. I made the Colts horseshoe the center focus with some nice detail to add texture, but I complimented it by placing it on top of a football field which again adds texture and a new color which helps the overall composition. I used a new technique on this cookie to create the field texture which turned out very well. 

Since this was for a 29 year old girl I decided to add a bit more of the decorative detail on top of the football theme as well as using secondary colors that compliment the Colts blue but also pop against it. 

According to Jeff the whole family loved it and didn't want to cut into the field at first, but then after eating the outside they couldn't help themselves and had to go for seconds and ended up eating the whole cookie. I love to hear that because as nice as the cookies look sometimes they taste even better...so just jump in, cut it up, and enjoy

Jun 3, 2010

Harley Cookie

click to enlarge

In an effort to get my name out and introduce people to my cookies I like to make one as a surprise from time to time for someone's special occasion. In this case it was my former supervisor's birthday and I thought that instead of the usual cupcakes the company buys for an employee's birthday I would make a cookie and maybe drum up some business at the same time. 

The design was easy. My supervisor is a HUGE Harley Davidson fan and is also a landscaper who happens to love flowers, so a centrally focused but well executed Harley sign in the center just felt right. After that, I could just fill in the rest here and there with vines, flowers, and texture. 

One thing that this cookie displays well is the impact our hand mixed colors can bring to a design. This wasn't just any orange, I made sure while hand mixing the colors that they were as close they could be to the company's colors. The effect is always noticed and appreciated (which is good because mixing the colors is one of the hardest parts about making these cookies). 

When I had the sign in the center done I was so happy with it that I almost didn't want to put anything else on the cookie, but after I added the flowers I think it brought the whole composition together. 

The design is very specific and doesn't seem to fit together to some people, but for the recipient it was the perfect design encompassing some of her favorite things and she was truly surprised and thrilled to receive it after I had been telling her all about my cookies.

Apr 15, 2010

Girl's Birthday Cookie

click to enlarge

It's an ALL PINK party!! 
That's all my Aunt told me when she called to ask me to make a cookie for her to take to her Granddaughter's 2nd birthday party. I don't actually know the birthday girl and only met her parents once or twice so Pink was the only thing I had to work with, but that was OK because I love a challenge and I LOVE designing for little kids especially for a little girl. 

I decided to do a large centrally focused number 2 mostly because I didn't have much to go off of except her age, but with this design I think I found a great template for future birthday orders that are not looking for something very specific or are looking to keep the cost of the cookie down because now that I have made it once I can easily replicate it with different colors and different secondary designs!!! I was pretty excited about that discovery, but the birthday girl's parents and family were just as excited about the cookie itself and I even received a very nice 'thank you' email from them telling me how much they enjoyed my work. 

I think what they and most others who receive a cookie appreciate about them are the level of detail that I put into my work. On this design specifically the 2 is something that is very fun to look at closely and see all the little additions, different colors, and different techniques. There are multiple layers just in the number with the base color, the spirals, the flowers, and the flower center and then I added pink sprinkles on top of the flowers for a little extra touch of pink. The butterflies came to be because I thought they fit in nicely with the flowers that were all around and they add some more depth and texture as they are rather raised in the actual cookie. I also added another layer of pink to the butterflies by accenting them with an edible pink powder that I can paint with. To tie all the elements together I made little action lines for the butterflies that I added white sugar pearls to which I think turned out to look pretty nice. 

I decided not to do a regular border for this one, but to continue the spiral design around the edge and keep it a bit cleaner. For this cookie I think that decision worked out well and I liked the effect.


(Same cookie design different little girl's 5th Birthday party)


I added a border this time using all the different pinks from the cookie plus a good sprinkling of pink sparkles all around the edge which added texture and very cute effect for the overall cookie. Who doesn't love sprinkles?


Apr 2, 2010

Office Farewell Cookie

click to enlarge

When my sister-in-law asked me to make a farewell cookie for her office administrator's move to San Francisco, I knew exactly what I wanted to do! As a former architecture student and lover of all things design and engineering the Golden Gate Bridge was a great choice for a focus on this cookie. Like I said, I love a challenge, especially one that I impose on myself since I was only asked to make a cookie for the office workers to enjoy at her party. 

It's the detail again that makes this cookie so special and one of my favorites. The giant bridge supports, the span, and the cables all work together and yet still stand out to make it instantly recognizable. The idea that the bridge spans across the entire cookie and seems to be trailing off into the background is one of the stronger elements of the cookie. The colors all work together as well helping the design and the detail used around the name add a nice element to the cookie that I enjoy.

My sister-in-law was blown away and so happy to be able to give this cookie  to her office manager and friend to thank her for all her hard work. I was glad to be able to surprise my sister-in-law and make her happy as well

Jun 12, 2009

Sunset Housewarming Cookie

click to enlarge

When my brother was moving into his new house with his soon-to-be bride my mom asked me to make them a cookie for their small housewarming party. I knew that they were looking at beach themes and colors for the house and their laid back attitudes inspired this design.

I took a much more artistic approach to this design. In my 2D work in school I stick to a much freer looser look in my drawings and I decided to try and use that technique here to create the sunrise and the water with all the colors running together. I really like how the effect translates in the sunset and water reflection and gives a feeling of movement like that moment right before the sun disappears over the horizon when the last light spreads over the edge of the sky. A hammock hung between two palm trees and a bucket of cold beers complete the relaxing beach scene while the addition of the 'Home Sweet Home' title to a seemingly un-homey setting adds a bit of fun.

The sketchy feel of the cookie can be bit overwhelming so to break it up a bit I used the iridescent edible paint throughout the sand, on the beer bucket, and in the palm leaves to add some depth and highlight some specific areas. Without a defined border and the scene running off the edge of the cookie I think that the highlighting adds some more interest to the scene to allow it to continue over the edge and not need a boarder.


Jun 5, 2009

Christine's Bridal Shower Cookie

click to enlarge

 A bridal shower is such a great occasion for a cookie. It goes well with multiple other smaller desserts usually served at a shower such as cupcakes and it allows a better display of the bride's wedding theme for all to see. I personally enjoy making bridal shower cookies because the importance and elegance of a wedding allows me to pull out all the stops in terms of my designing skills. There is always a theme and specific colors or a specific design that the bride has for the big day and I get to add my spin on it to make the bride happy as we celebrate her on that day. 

For this cookie, a long time friend of mine from grade school through high school and now was getting married in St. Louis where she lives now with her husband. She came back home for a beautiful shower for all of our hometown friends and their mothers. It was a perfect shower and luncheon, but it was also an opportunity to showcase my cookies to my friends who all live in different cities now. 

For all these reasons I tried to make this cookie extra special and I spent hours trying to achieve my design objective which doesn't show well in photos, but which was really special in person. The white band across the cookie was where I put a lot of my focus using just icing to create an angled stair step appearance around the center icon that they used as the theme of their wedding. The white texture radiates  up and out from the center putting the focus on the center icon and is delicately detailed to emphasize the raised texture with iridescent sugar pearls and contrasting dark blue scrolls. A light blue folded ribbon finishes the detailed band nicely bringing it all together. 

Because of the amount of detail I put into the center portion I decided that a simple swirl pattern incorporating mostly the darker colors and smaller versions of their wedding theme icon would be appropriate and compliment the stark white of the band. Usually I don't like to used the darkest color right against the cookie because it gets lost, but in this execution I think it actually serves the design of the cookie better and I love the way it turned out.

The icon design is taken from a necklace off of Heidi Klum's jewelry line which the bride loved so much that she transformed it into her wedding theme. To distinguish the stark white in the center of the icon with the stark white surrounding it I utilized my awesome new technique that I discovered. I again chose to use the more elegant silver as opposed to a color which serves to make the names pop and works as a great background.

Overall, this was such a fun cookie to make for a good friend and I loved the icon and colors that I got to work with. All the hard work paid off and it was part of a perfect afternoon.


A better view of the textured band

May 23, 2009

Owen's Baptism Cookie

click to enlarge

When I get to create cookies for special occasions like Baptisms I always try to make it extra special and pull out all the stops in terms of utilizing new techniques. 

For this cookie for my nephew's baptism I again utilized design from the plates and napkins that his mom chose for the party as a base for my overall look. I really liked the way the last baptism cookie turned out so I kept a similar composition with the solid square in the center and cross on top surrounded by the design from the napkins. 

The cross is a large version of the one found on the napkins, but the different depths and textures added make it pop against the background which is something I am especially happy with and proud of because it's a new technique for me that I just discovered. Wilton makes an edible iridescent powder in all different colors that when added to a little bit of vanilla turns into a liquid that I can then paint with. This was my first attempt at this technique, but it turned out so well I plan on using it a lot. The silver color kept it elegant and was subdued enough that it only emphasized the cross and words written on top.

I like the bold and layered design of the swirls all around the edge and I think it holds its own as it travels down around the edges not needing a border, but relying on the design itself for all the impact.